How to Install Google Assistant to ANY Android phone | No Root
Google Assistant,
Google Assistant on Android,
Google Assistant without root,
how to install Google Assistant on android
Edit
Google Assistant comes with Google Pixel Devices and so far, Google has not given it to every user. But This is amazing feature for Smart Phones and Everybody would like to install it on the phone. Now you can install it on your any Phone without Root. This method works for Android 4.1+. In this post I'm going to tell you three methods. The first method is for the Non Rooted device, Second method is for Rooted Device. And the third method is for TWRP users. You can also install Android on your old PC.
These files will need for Non Rooted
How to Install Google Assistant to any Android phone No Root
It will not answer your query via Robot voice But it will send a message to you in response to the question.
Once Reboot is done. Now open Settings > Application Manger and find the Google application from the list and clear its data and cache files. Once the Google App restarts successfully, Go Back to your home Screen and Just press and hold your home button. Congratulation Now you have Google Assistant on your old Android Device.
How to Install Google Assistant using TWRP
Once Reboot. From your Home Screen and Just long press your home button. Congratulation Now you have Google Assistant on your old Android Device.
These files will need for Non Rooted
- Android 4.1+ OS
- Google Allo Application
How to Install Google Assistant to any Android phone No Root
- First, you need to download Google Allo application on your phone. (Download link given at the end of the post)
- Install it on your Device
- Open it and Register it with your working phone number
- After registering you can use it
It will not answer your query via Robot voice But it will send a message to you in response to the question.
How to Install Google Assistant on Android
These files will need for Rooted users- Solid Root file manger
- You need to download Solid Root Apk on your phone. (Download link given at the end of the post)
- Install it
- Open and Enable Root Explorer from Tool bar
- First enable the root storage feature from the slide out the left-hand panel and tap the settings_gear_icon. Scroll down to the bottom and check “Show root storage. Now Go back.
- Again Tap on the three line menu button from top left corner and select Root.
- Scroll Down until you see System Folder, open this folder.
- Scroll down until you see build.prop file. Just tap on “build.prop” and make sure Open the file using SE Text Editor.
- Find the line that reads ro.product.model=[YOUR_DEVICE_MODEL_Name] and replace it with this line: ro.product.model=Pixel XL
- Add this line after: ro.opa.eligible_device=true
- Save and exit the file and file manager.
- Reboot your device
Once Reboot is done. Now open Settings > Application Manger and find the Google application from the list and clear its data and cache files. Once the Google App restarts successfully, Go Back to your home Screen and Just press and hold your home button. Congratulation Now you have Google Assistant on your old Android Device.
How to Install Google Assistant using TWRP
- These files will need for TWRP users
- TWRP Recovery Per Installed
- Download three zip files from the end of the post link given.
- Copy all three files in your device internal storage
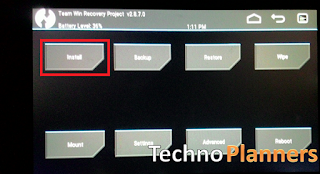
- Now Reboot your device into TWRP Recovery mode
- Once TWRP Recovery boot, Tap on Install
- Now find Google_Assistant_Velvet.zip and flash it.
- Similarly, flash Google_Assistant_BuildProp.zip
- Reboot your device.
Download here
Google Allo APK- http://bit.ly/2kyGEEu
Solid Root Apk- http://bit.ly/2l7d1GS
Three zip files- http://bit.ly/2eh6ZSJ
Once Reboot. From your Home Screen and Just long press your home button. Congratulation Now you have Google Assistant on your old Android Device.

